Last Updated: February 9th, 2023
4 min read
Severs Australia


Last Updated: November 27th, 2023 14 min read Servers Australia
Choosing to move your server into a data centre for colocation is a strategic decision that can yield numerous benefits for your business. By opting for colocation services, you entrust your server to a specialised facility with top-tier infrastructure, security measures, and connectivity. This move enhances the reliability of your server through features such as redundant power systems, advanced cooling, and robust network options, minimising the risk of downtime.
Colocation provides a scalable solution, allowing you to adjust your IT infrastructure according to your business needs. The professional management and maintenance offered by data centres free up your time and resources, enabling you to focus on core business activities while ensuring the security and performance of your server infrastructure. In essence, colocation offers a cost-effective and efficient way to enhance the overall reliability, security, and scalability of your server operations. Read the guide to Colocation.
Data centre migration refers to the process of moving an organisation's data, applications, and other business elements from one physical location to another. This relocation may involve transferring the entire data centre infrastructure or a subset of it.
Cost Savings
Scalability
Improved Performance
Enhanced Security
Business Continuity and Disaster Recovery
Adoption of New Technologies
Compliance and Regulatory Compliance
Streamlined IT Operations
Energy Efficiency and Environmental Impact
Flexibility and Agility
Data centre migration provides an opportunity for organisations to optimise their infrastructure and reduce operational costs. This might involve moving to a more energy-efficient facility, adopting cloud hosting, or consolidating servers to eliminate under-utilised resources.
Organisations often migrate their data centres to a more scalable environment to accommodate growing business needs. Cloud-based solutions, for example, offer the flexibility to scale resources up or down based on demand, allowing for more efficient resource utilisation.
Upgrading hardware, networking equipment, and adopting modern technologies during a data centre migration can lead to improved overall performance. This is crucial for ensuring that IT systems can meet the demands of evolving business requirements.
Newer data centre facilities and cloud providers often invest heavily in security measures. Migrating to a more secure environment can help protect sensitive data and infrastructure from potential threats.
A well-planned data centre migration can enhance business continuity and disaster recovery capabilities. This might involve implementing redundant systems, geographically distributing data, and ensuring that backup and recovery processes are robust.
Data centre migrations often coincide with technology upgrades. Organisations may use the migration as an opportunity to adopt the latest technologies, such as virtualisation, containerisation, and software-defined networking, which can lead to increased efficiency and agility.
Migrating to a data centre that adheres to industry-specific compliance standards and regulations can help organisations ensure that their IT infrastructure meets legal and regulatory requirements. This is particularly important in industries such as healthcare and finance.
Consolidating data centre or moving to a more centralised infrastructure can lead to streamlined IT operations. Centralised management and monitoring can improve efficiency and make it easier to implement standardised processes.
Organisations may choose to migrate to data centres that prioritise energy efficiency and sustainability. Green data centres use technologies and practices aimed at reducing environmental impact, such as using renewable energy sources and advanced cooling systems.
Cloud-based solutions and modern data centre architectures provide greater flexibility and agility. Organisations can quickly adapt to changing business requirements, scale resources as needed, and deploy new services more rapidly.
When you decide to migrate your data centre, you open up myriad possibilities. You can spend some time cleaning house, so to speak, and streamline your assets. You can review your equipment and procedures, and you can make upgrades as needed. By spending time planning your migration, you increase productivity and efficiency in your new location.
Before you begin your move, consider the following planning steps:
Ensure you are moving to a tier rated data centre.
Determine the individuals in your organisation who need to be involved and the roles they will play in the move. Be sure to include representatives of your IT department as well as operations, and notify any team members who will be affected.
Consider your long-term technology planning. Do you expect changes in your company or your industry that may affect your technology needs within the next few years? Your move is the perfect time to plan for coming changes.
Induction
Create a plan
Create an inventory
Make and IT disaster recovery plan
Prepare for your move
Choose the right time for migration
Before you begin breaking down equipment, check to ensure that all components and parts are present, and notify any vendors with whom you have ongoing contracts for service. Make sure you have all serial numbers and proof of warranties for all your equipment, and keep everything together. Ensure that you will not invalidate any warranties by moving the equipment. Read the Colocation Cheat Sheet.
You may determine that you need some new equipment and that you do not wish to move everything housed in your current data centre. The move is the ideal time to retire legacy technology components and transition to newer models.
Once you’ve completed the initial planning phase for your new data centre, you’ll need to attend to the details. Before you begin moving equipment, take the following steps.
The first thing you will need to do before accessing the facility is to complete a Colocation induction. This will show you how the facility works and what can and can’t be done from a facility point of view. Each facility is different, so expect an induction for each site.
Put together a specific plan, timeline and lists of tasks for the move. Consult your IT team, administrators and other stakeholders.
Create a comprehensive inventory of all items housed in the data centre, and determine what will be moved. Include the stakeholders that control each asset, along with the persons and departments that use the equipment.
Create an IT disaster recovery plan, or implement an existing plan. Before you begin your move, ensure that you have redundant, comprehensive, offsite backups of all data and applications. Use your disaster recovery plan to test your backups before you begin the move.
Pack and Prepare for the Move. Physically preparing your equipment to weather the move safely will be a big job. Be sure to assemble enough team members to help with both preparation and the move itself. Typically, such a move occurs during an evening or weekend, so make sure team members will be available when you need them.
Choose a time for the move that avoids any especially busy periods for your company, and make sure your team members for the move will not be needed on other major projects. Designate specific jobs for each team member — including individuals who will physically move items and those assigned to setup and testing in the new location.
Label all items clearly as you pack, and note the specific areas where the equipment will be installed. Be sure to recycle or find other environmentally responsible methods of disposing of any unwanted equipment and supplies.
During the move, have a plan to maintain security, and ensure that any equipment containing sensitive data remains under the watch of multiple team members.
Assessment and Planning | Take a data centre tour |
Define migration goals and objectives | |
Assess current infrastructure | |
Scope migration details | |
Develop a detailed migration plan | |
Gather and purchase tools | |
Risk Analysis | Identify potential risks |
Assess impact on operations and data | |
Develop contingency plans | |
Infrastructure Design | Design new infrastructure |
Consider scalability and redundancy | |
Ensure alignment with business needs | |
Data and Application Migration | Plan data and app migration |
Choose migration method | |
Test migration in a controlled environment | |
Testing and Validation | Conduct comprehensive testing |
Perform performance and security testing | |
Validate data integrity | |
Deployment and Optimisation | Implement migration plan |
Monitor in real-time | |
Optimise new infrastructure | |
Update documentation |
You will need to take your own tools with you to complete your colocation migration. It can be really inconvenient and expensive to have to run out and buy tools. A pack of rack nuts is required for mounting equipment. These can be purchased at the onsite parts vending machines.
Ensure that your mounting hardware kit is vendor-supplied and approved, and always follow vendor installation instructions. Incorrectly installed hardware will be flagged for rectification works. Using other devices or anything else as shelves for your server is a no-no!
Always take your own tools with you to complete the job (and more!) Our own technicians always carry the following tools with them;
Pliers
Side cutters
Screwdrivers (Phillips and Blade)
Security screwdrivers (Commonly seen in HP and IBM servers)
Scissors
Velcro ties
Rack nuts
Cable ties (avoid using these as you need extra tools to remove them, but handy to have to help guide cables)
It’s a good idea to install software and configure and test your devices offsite. This will save you a lot of time during installation and will mean less sitting around the data centre. If you need to do a full stand-up deployment, let us know, and we will pre-book a staging area in the Data Centre for this.
Security is paramount in Data Centres, so never leave your rack unattended. Not even if you step away for a couple of minutes. Most of our sites offer personalised swipe card access, but if not, security is always happy to lock and unlock racks. No matter how many times it’s required.
Adequate cooling is one of the biggest considerations when racking your equipment. Equipment needs to be placed on the rack so that it takes in air through the Cold Aisle and moves it effectively to the Hot Aisle. This is fairly easy when you’re racking a server, but it varies with network equipment. Most network equipment vendors will offer 2 different types of fans to support how your equipment is racked. It’s essential that you have the correct one before you start. You can ask your Data Centre to provide Blanking Panels for any RU left empty, this prevents hot and cold air from mixing.
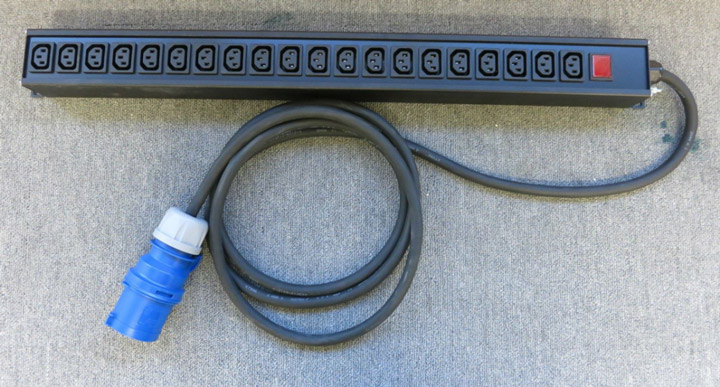
It’s really important to find out which cables you need before you start a deployment because having to purchase cables on-site is very expensive! The general rule in RU1-20 is; ½ -1-meter power cables and 2-3 meter Ethernet cables, and in RU 20-40; 2-3 meter power cables and 1-2 meter ethernet cables. Also, make sure that you have the correct power cables and outlets. We use C13 power outlets. Remember; PDU’s are at the bottom of the rack, and the ethernet switch is at the top.
Keeping your cables tidy may sound simple, but it can take some practice. Ethernet looks best in a bundle down one side of the rack, avoid cables longer than 2 meters, and make sure they are run with a bit of slack. All cables should always run down the side of the rack and should be routed so that they don’t impact any other spaces in the rack. Long, bunched-up power cables are what cause Data Centre fires and should always be avoided. Top Tip: The neatest-looking racks usually have short power cables and longer ethernet cables.
Always use vendor-supplied and approved mounting kits for all equipment. Never use another device as a shelf or leave your device sitting on something. If you don’t have, or you can’t source a vendor-supplied mounting kit – an approved shelf WILL require an extra RU of space. Always follow vendor instructions for racking hardware. Hardware that has not been correctly installed will be flagged for rectification work.
The Data Centre is a shared space, so the tidy-up after deployment is really important. Ensure that nothing is left outside your allocated rack space and that everything fits inside it. This includes rubbish, spares and anything else you brought with you. It is especially important to ensure that cardboard is not taken into the rack and cage area. It needs to be disposed of in the staging area as cardboard is highly flammable and a fire risk.
Make sure that you have created detailed deployment documentation. Take notes of all server labels, serial numbers, error conditions, connections, and which rack unit houses which equipment. This will make logging smart hands tickets with us or troubleshooting yourself much easier. Photos are also really helpful, but make sure that you get security to be in attendance to ensure that you’re only photographing your own equipment.
Servers and other equipment can weigh upwards of 25Kgs and it is highly suggested to use 2 people to lift them as needed. If you are installing even heavier equipment, some sites offer device lifting platforms through prearranged bookings to make the collocation process an easier one.
Everything always takes longer than you think it will in a Data Centre. Allow time for access through security, transporting equipment through the Data Centre, racking equipment, cabling, and testing. It is also a very harsh environment (noise, air quality, and lighting conditions) make sure you take frequent breaks (especially for water) to ensure you do not exhaust yourself.
Be mindful that the space you are using is shared. Take rubbish away with you and don’t leave anything outside of your allocated rack space. This includes cables on the ground, servers not racked into allocated spaces, and spares you may want to leave on site. Everything must fit your allocated colocation space.
Never leave an unattended rack unlocked. Even if you are only stepping away for 2 minutes. Security will happily unlock the rack as many times as required. Most of our sites also now feature swipe card rack access so you can lock and unlock racks yourself.
This is a hard one that takes a lot of practice. Have a look at some of the other racks that look nice. They will likely have short power cables, but longer ethernet cables. You will probably see that all the ethernet is in a bundle down one side of the rack. Run your ethernet cables and power cables with a little bit of slack (don’t use anything longer than 2 metres!). Ensure you run cables down the side of the rack and that they are not routed anywhere that impacts any other space in the rack. Do not leave a really long power cable bunched up either. This is how fires start in Data Centres.
Once installed and quickly tested, tidy up your cables with Velcro. It is easier to remove than cable ties and allows for multiple reuses. Test again once you lock up your rack before leaving the site to ensure everything is working.
Bring a copy of all your provisioning details, including site ticket numbers, racks, rack space, switches, switch ports, and IP addresses. You will need ticket numbers and rack details as soon as you arrive for security to authorise access and show you to your rack. This makes the colocation process as safe and secure as possible.
Once your team has moved all data centre components to the new location, allow sufficient time for assembly and installation. When the move and setup are complete, you can begin comprehensive testing to ensure that equipment is up and running to your operational specifications.
You may be tempted to put the move behind you immediately, but take time to conduct a review. Speak with the team members who assisted, as well as company executives and system users, to evaluate what went smoothly and what can improve for the future. Create documentation that your team can use for any future data centre moves.
After completing your move, periodically assess the many benefits of your new data centre — from 24-hour support to high-level security and customised solutions. If you’re just entering the planning phase for a data centre migration or for your Colocation, use these best practices to make your move a success. Here's some Colocation options.